20/20 Eyesight, 100% FREE, HOLISTIC and NATURAL: The Bates Method

20/20 Eyesight, 100% FREE, HOLISTIC and NATURAL: The Bates Method
Want 20/20 vision? Correct your eyesight with a FREE, holistic and natural method. THIS REALLY WORKS! My vision has improved from -4.75 to -3.75 after one month of doing the Bates Method!
It is now over 100 years since Dr William H Bates first began developing and refining his theories of the causes of poor sight. He used his method for short sight, long sight, astigmatism, old-age sight, squint, ‘lazy’ eye, and even structural diseases such as macular degeneration – nothing was left out and he found all could be benefited by learning normal and relaxed use of the eyes and mind.
Bates had fully trained as an ophthalmologist and in the late 1800s ran his practice as conventionally as any other: he put people in glasses and told them there was nothing that could be done about it. How he changed his opinion to the opposite view is not fully known, but the change was absolute.
The latter part of his life until his death in 1931 was punctuated by episodes of conflict between himself and his former colleagues and many attempts were made to discredit him – near the end of his life he was due to appear in court but his death curtailed the event. The people who followed in Bates’ footsteps have come to his method from a different route. A new model of vision required a new approach, and almost all practitioners of the Method are rarely medical people. They are educators.
Techniques: Palming
This lesson is an introduction to the art of palming, as developed over a hundred years ago by Dr. Bates:
All the methods used in the eradication of errors of refraction (improving vision) are simply different ways of obtaining relaxation. Most people, though by no means all, find it easiest to relax with their eyes shut. This usually lessens the strain to see, and in such cases is followed by a temporary or more lasting improvement in vision.
But some light comes through the closed eyelids and a still greater degree of relaxation can be obtained in all but a few exceptional cases, by excluding it. This is done by covering the closed lids with the palms of the hands (the fingers being crossed upon the forehead) in such a way as to avoid pressure on the eyeballs. So efficacious is this practice, which I have called “palming”, as a means of relieving strain, that we all instinctively respond to it at times, and from it most people are able to get a considerable degree of relaxation.
Dr Wm. H. Bates:
The Cure of Imperfect Sight Without Glasses (1919)
Spend some time each day Palming

To palm is to cover your closed eyes with your hands in such a way that there is no pressure on your eyeballs. The palms of your hands are slightly cupped over each eye (left over left and right over right), and usually the fingers are partly interlaced on your forehead.
SPIRITUAL PSYCHOLOGY: Blind people have dreams. In conventions for the blind, they often segregate themselves as being born blind versus being advantageously blind (where blindness occurred after being able to see).
My advantageously blind Psychology of Sleep and Dreams professor stated that once he went blind, he still retained the ability to see in his dreams, but after a while, his dreams became more sensory related to touch, smell and sound versus visual cognition.
There should be no light, or as little as possible, allowed to enter the eye. Once you are palming, open your eyes and look around to see if you can adjust your hands in such a way as to exclude as much light as possible. Close your eyes.
Note:
Palming is supposed to be relaxing, but you may end up being tight in your hands and arms in order to exclude light. Don’t overdo it, and if necessary compromise. The next time you palm you may find a better position for the hands. Palming in a darkened room can be helpful.
Palming Positions
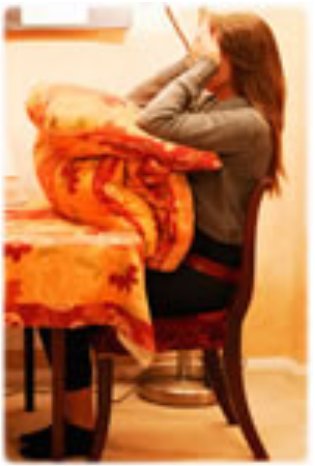
Sitting in a dining-type chair in front of a table with a stack of cushions, (or foam pads) on it. The cushions are for resting your elbows: there should be enough cushions so that you are able to easily bring your palms to your eyes without stooping forward (too few cushions), or having to look up (too many cushions). Rest your elbows on the cushions and bring your hands to your eyes. Close your eyes, rest with the darkness, and don’t forget to breathe!
TRIVIA: You are what you eat! While eating carrots is good for your eyesight, eating TOO MANY carrots will cause Carotenaemia, which makes your skin turn orange!
Lying on your back, with a few books or pillow under your head, and your knees up and feet flat on the floor. Bring your hands to your eyes, and start palming. The disadvantage of this is that you have to hold your arms up, which can be difficult if you want to palm for a long period.
How long should I palm?
There is no fixed answer to this question. Some people enjoy palming as soon as they first try it, while a few people never find it enjoyable. As a result there is a different answer for each person, and it can vary from day to day for the same person – it would be counterproductive to force any strict rule: vision rebels against this.
For the first time, try setting your alarm clock to ring at the end of five or ten minutes. Palm, and after the alarm goes off ask yourself if the ringing alarm left you feeling relieved…. or annoyed! If you felt relieved, then palm for less time; you can benefit from palming for just fifteen breaths at a time. If you felt annoyed, then ….. throw the alarm out the window.
If you one day find yourself happy to continue, then do so: you can’t do too much palming if you are feeling happy.
How often should I palm?
If you quite like palming then find at least one time in each day that you will be able to palm without disturbance. Make a mental note of any feelings you have ( e.g. happy, sad, confused, spaced out…) and also note what your other senses are receiving: listen, be, feel the support of the chair and floor, breathe.
During the day take regular short breaks and have mini-palms. You don’t have to set yourself up in one of the “palming positions”, just start palming as soon as you think of it. As you have a mini-palm, notice how your breath rises and falls. Count each breath cycle until you get to fifteen or so, and then stop.
This latter method can also be used if you find palming unenjoyable. Don’t palm for long, but do palm often, up to as much as twenty times in one day.
Some questions to ask yourself:
Do you see nothing, or shapes, lights and colors?
How do you feel when you palm?
Do you feel relaxed after palming, or do you feel anxious?
There are so many things that you could notice – even not being able to palm is interesting and gives you valuable information for further work. The only rules are those you make up for yourself!
Start palming today, and do it every day for a week. If you like it, keep going and make it a regular part of your every day routine.
Techniques: Sunning
It’s easiest to first try this out with a lamp, as the light source is constant and controllable. The best type of lamp for this is a desk lamp – something like one of those equipoise lamps that can be directed to different angles (also known as anglepoise – see photo).
If you’ve not got one of those, then any lamp that can be directed up toward your face will do fine. The best light source of course is the sun, but if you find that too bright at first, a lamp is easier to manage.
I’ll talk this through assuming you’ve got an angle poise lamp with about 100 or 60 watts for the bulb.
Sit somewhere you can palm easily after sunning and can direct the light source straight at your face – you’re going to go straight into palming after sunning, so the easier you can do this, the better.
In sunning, the eyes are closed throughout
So, close your eyes, and slowly direct the light to your face. If there is any discomfort, it means the light is too close and too bright at first. One of the key things to look for is any sign of pain or strain coming into the muscles around the eyes. What I want to encourage you to do, is to go so slowly that at no point do you experience “too much”. So, go slowly. If you feel comfortable, you can bring the light closer, until it feels like a pleasant warmth all over your face.
Think of a point far in the distance (imaginary horizon) Imagine where your nose is pointing to, and imagine you are looking in that direction (eyes are still closed, but if they opened, would be gazing toward that far point).
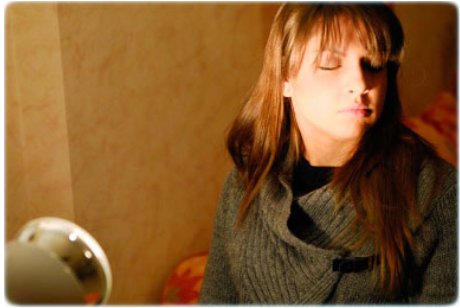
Turn your head gently from side to side As you turn, each eye goes into the shade. This movement is slow and steady, taking about 3 seconds or so to move from the left to the right (or the right to the left).
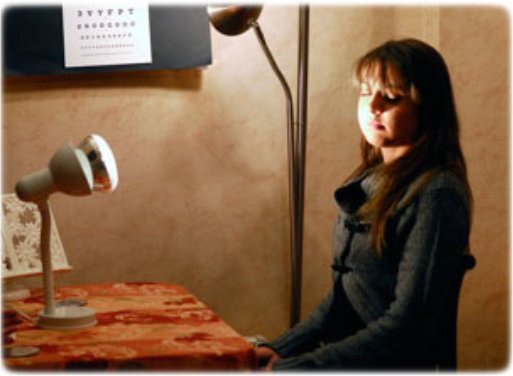
Keep in touch with the point
As you turn your head, keep in touch with the point that your nose is directed toward – this will of course be moving across your imaginary horizon, but the relationship to your sight will still be in the same place, thus your eyes and head move together.
Remember to go slow!
If your eyes are sticking or dragging, or wanting to fly ahead, take your time even more, and notice when they go into their jumpy mode. See if you can take yourself over the point of “choosing” to jump, without actually doing so (this is a lesson in it’s own right)
Sun for no more than three minutes
This is all that is needed to relax the eyes.
Always palm after sunning!
When you start to palm – turn the light away, or off, and notice all the gradations from the change of light into darkness as your hands come to cover your eyes. Going slow helps a lot here.
Palm
Palm as per normal, you may notice a different quality to the palming, sometimes more images, sometimes less. Palm until your field of vision is calm, or ‘normal’ for you.
Techniques: The Long Swing
For the Long Swing you can be looking out a window, standing in a field or in a forest, or just in a room – each place provides a slightly different experience, but they can all be very effective in their own ways.
There are four levels of difficulty in the Long Swing – the one described in this lesson is the easiest, and is the way beginners are generally taught. There are two preliminary steps, which are described next.
Note – many of the instructions can be varied, but for the purposes of clarity, and for initial learning, it is good to have clear boundaries around each step. Just bear in mind that you may wish to experiment at a later stage.
Preliminary 1 – Using a pointer
It is good to first practice the long swing with a pointer; something like a knitting needle works well, or just a long thin stick of similar length or a bit longer. The stick is held with both hands directly in front of you, so that the tip of it is pointing straight up or a little away, and at eye level or slightly below.
Key points:
Stick or similar pointer
Hold with both hands
Directly in front.
Preliminary 2 – Choreography
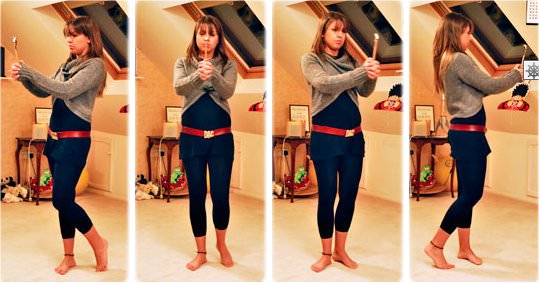
The Long Swing is a little trickier to learn without demonstration than the sway – the footwork particularly seems difficult to learn with words, which is why I tend to teach it in correspondence as leading from the Sway. If you’re at all unfamiliar with the original instructions for the sway, it may be worth while just refreshing your memory on them. You can learn this part of the long swing without paying too much attention to what your eyes are seeing – that will come in later.
Learning the movement
First, stand with your feet about shoulder width apart and then gently rock from side to side as if you were going to practice the sway. Remember to let each heel lift from the floor in turn, and when you have a good motion going, perhaps noticing the movement around you as you already know, start to turn your upper torso, keeping the head and shoulders moving together, in the direction of your sway.
This means, that as you rock toward your left foot, turn your upper body to face that direction, then as you rock toward your right foot, turn your upper body to face that direction, to the right.
At this point you should find it reasonably comfortable to turn about 45 degrees to the left and 45 degrees to the right of center.
Now, bring your attention to your heels. Firstly, allow your heels to turn further out. This should provide considerable ease with the turning at the top of your body – so much so that it becomes possible to do a full 180 degrees – 90 degrees to the left and right of center without much trouble.
Imagine you can point with your heels. You will find the turning easiest if you think of pointing each heel in turn directly back and up to the wall behind you.
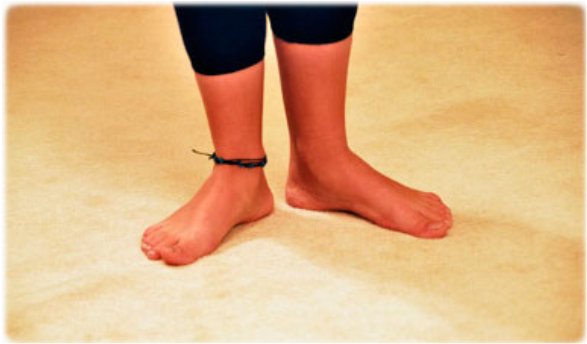
Close up of feet in long swing – note the heel has started to point out. The person is at this point turning to look to their left.You may also find it comfortable if, when turning toward the foot you are about to stand on, the heel comes further in than where you originally started. Think of the way Charlie Chaplin would walk – with toes pointing out.
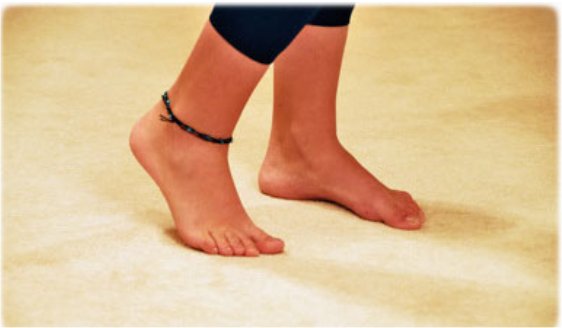
Close up of feet at mid-point of long swing. The heels come together Charlie Chaplin style.You are only in that position for a moment, before the heel of the other foot lifts, and then you’re turning it out again.
The Long Swing
Once you’ve got this feeling pretty easy, it’s time to add the visual part of it. For this, you just take up your pointer with both hands, and hold it at eye level. Look at the tip of it, and if all is going right, you should suddenly see that the world turns, like the swing of a pendulum, from one side to the other.
How it looks:
Do this for about five to ten minutes, and see how it feels. It’s unlikely that you will get unpleasant symptoms – sometimes people feel a little dizzy, sometimes even a little sick, but mostly it should be without any sign of discomfort. If you are feeling strange, it is OK to stop, rest, and palm, and try again later. If you feel it is easy, you are welcome to do it longer than ten minutes.
Techniques: The Head Swing
The Head Swing is a little more difficult to practise successfully compared to the Long Swing. The reason for this lies in the nature of the movement.
Donate to In5D
With over 6,000+ free articles and 1,200+ free videos, any donation would be greatly appreciated!
Much love for your kind donation,
Gregg
To explain: as with the Long Swing the desired movement is to allow the eyes to slide easily across the surfaces that are in front of you. It’s a slightly strange request, because naturally the eyes and mind prefer to regard objects and take them in, not move on in every instant.
The problem with regarding objects and taking them in only arises when eyes have become impaired in some way and looking at objects has become habitually an experience of getting stuck: a process of forcing the vision or staring. In this condition it feels very awkward to move on easily and so we use these techniques to help the sight back to being free and fluid.
In addition, the eyes constantly compensate for any movement of the head and body – as you move or walk along your head may go through many continuous subtle shifts of angle, whether turning to the left or right, or just tilting slightly with each step. Every one of these movements is assessed and adjusted automatically by the visual system, making it possible to track objects that are changing their position in relation to you.
What’s needed with the Head Swing
With the Head Swing it’s necessary to learn how to let the eyes rest and not constantly adjust for the movement of the head. The reason the Long Swing is easier for this is because the movement that turns your eyes in the Long Swing is located further down the body – in the legs and hips, whereas with the Head Swing the movement takes place through the neck, making the movement in very close proximity to the eyes.
Tools to help
As with the Long Swing there are various ways in which people have found assistance through the use of pointers or with the conceptual equivalent. Here are a few that you may find useful:
A physical pointer
Similar to the use in the Long Swing, this can be applied in the same ways, as a point to look directly at, or beyond, or to split the point (gate technique). Use a knitting needle or a stick. I have two orchestral conductor batons that are wonderfully light for this.
Nose pencil
Imagine your nose is very long and touches the surface of everything you a looking at. Draw an unbroken line from one side of the room to the other. Slowly. Follow the point with your eyes.
Nose brush/nose feather
Some people find the ‘pencil’ too rigid and are helped more with a softer concept. Touching your visual field lightly with your eyes can make it easier to keep moving.
Third eye
Imagine your Third Eye just in the middle of your forehead, picture it as being unable to turn in a socket so it always has to look directly out of your face. Imagine you are looking out of this eye and your two physical eyes just follow along.
Busy bugs
As you look at the surface of your visual field imagine a small bug crawling along exactly where you are looking. This is great for showing just how slow you can go.
Scooters, bicycles, cars etc.
Any object that moves and you can imagine it can be of assistance, the main thing is to keep your head and nose directly facing it – at least for the purposes of the head swing.
Real moving things
This can be a fun game – using real cars or crowds of people all moving around, just pick one, follow it/him/her with your nose (turning your head, not literally snifing the ground where they walked!) and notice the way in which the rest of the world moves in the opposite direction.
The Head Swing
To make this as effective as possible, sun and palm first.
Sitting comfortably with your eyes closed, turn your head easily to the left and open your eyes. Regard a point on the surface of your visual field in the direction your nose is pointing. Imagine touching it with a finger/nose pencil, or whatever method you find most helpful.
Slowly and gently turn your head to the right, allowing the head and eyes to remain in alignment at all times. This can take some getting used to and it’s helpful if you can have an observer give you independent feedback. The following images show examples of what to look for:
In this first image the student is looking directly ahead, the vision is attentive and focused on the distant surfaces in the room.

Here the head swing continues with the eyes and head still in alignment
Here is an example where the eyes have drifted ahead which indicates exertion of the eye muscles. While this sort of movement is quite normal in everyday use, for the purposes of learning how to relax the eyes it’s important to let the head do as much of the movement as possible.
See if you can go gently enough to notice exactly when your eyes start to jump in on the a Getting the movement going
As objects pass under your central gaze, notice them and let go of them. As you move to the right, objects in your right visual field move to the centre, cross it, and then move to the left visual field.
When you get to the far right, move in the opposite direction to the left – and all movements described above are reversed.
The sensation of movement in the visual field can come easily or can be difficult – for some people it can take many weeks to get it really going. The essential feature to understand is that the experience of movement is not only natural, but the more you see the movement the more it indicates that your eyes and mind are relaxing.
Once you’ve done a few passes, try it again with the eyes closed, remembering however much you can of the objects in your visual field: where they are and how they move from one field to the other in the opposite direction of the movement of your head.
It’s not a race and not a test, there is no requirement to remember everything perfectly. Being gentle with yourself is the guaranteed method of making all of these things become very easy.
Open your eyes and carry on with the Head Swing. Once you know it well it’s very quick to apply at any time during the day: waiting for the bus, on the phone, washing the dishes, talking to your boss.
Or perhaps not the last one!
Techniques: The Prayer Swing
The Prayer Swing is really a form of Head Swing, the main difference being that it is done with the eyes closed. Here’s how to do it:
The Prayer Swing
Position: Sitting at a desk with your elbows resting on some cushions – ideally a position suitable for Sunning and Palming first.
After you finish Palming keep your eyes closed and bring your hands out in front of you. You can clasp them together as if you were to pray, but the purpose is simply to allow your hands easy support of each other, putting them about six to ten centimeters in front of your face.
Eyes Closed
With your eyes gently shut, register the presence of your hands.

Wait a few moments then breathing gently and without hurry, slowly turn your head continuously a few centimetres to the right and then the left.You may notice that your eyes start to dance – trying to either look ahead of your movement (further to the left or further to the right) or to stick and drag back to where your hands are; the aim is to give your eyes the time to calm down and what this usually means is to go a little slower.

The principles of the movement are exactly the same as with the Long Swing and Head Swing – keeping the eyes resting calmly in alignment with your head. Thinking of a nose pencil, third eye, or distant moving object are all supportive methods to enable the eyes to be calm (see Head Swing).Prayer Swing showing hands to the right of the eyes – from the student’s point of view. While it is the head that moves, the relative position of the hands has changed.

Prayer Swing showing hands to the left of the eyes – from the student’s point of view.When you feel your eyes are calm, gently allow the awareness of your hands to grow – so that you can experience an easy apparent oppositional movement of the hands.
Let things move
As the movement you experience is in the imagination and the eyes are not affected by visual edges, it become possible to expand the movement of the Prayer Swing very easily. Logically, your hands are attached to your wrists and forearms, leading to the cushion under your elbows, your lap or the desk you’re resting on – each of these items also can be experienced as moving. Let your awareness expand step by step; if you suddenly find the movement locking down, come back to a more basic movement.
With a little practice it is possible to get your whole room moving, the building you’re in, the surrounding country, the world, and even the stars above. With a little more practise it’s even possible to know that your head is still, and everything really is actually moving.
Techniques: The Optical Swing
The Optical Swing is easier after learning and practicing the other swings. What is needed is plenty of familiarity with allowing the visual field to move; the Long Swing, Head Swing and Prayer Swing all lead to that end.
The Optical Swing
The Optical Swing involves tracing a line either vertically or horizontally with the eyes only. When the mind is at rest, the movement of the objects viewed is apparent and real, but this effect only becomes possible when you stop looking for it.
If that doesn’t quite make sense, think of it this way: Always with the Bates Techniques we are trying to break free from the habit to stare. Allowing the eyes to move freely and letting the world move as a result is the stare’s nemesis. But when a person attempts to look for the movement, the first thing to jump back in is the habit to lock the eyes and the perception down – the stare comes in with a vengeance.
You can’t lock down something that needs to be released and the optical swing is the most subtle form of swing to test your ability to let go. Any effort or force will show itself instantly, giving you clear feedback as to the state of your thoughts.
Bates made the following observations about the optical swing:
MOST people when they look at stationary objects believe that they see such objects stationary; but if they observe the facts more closely, they find that when the normal eye regards a small letter of the Snellen Test Card with normal sight, the letter does not appear to be stationary, but seems to move from side to side, a distance about the width of the letter. This is called the optical swing.
During the late war, a soldier, who was rated as a sharpshooter, told me that when he regarded the bull’s eye of a target five hundred yards away or further, that he had difficulty in aiming his gun properly because the bull’s eye seemed to move from side to side a very short distance. Both he and others who had observed it did not discuss the matter with any great interest.
The movement of a letter or other object from side to side in the optical swing is so short, so slow, that most persons with normal eyes have never noticed it. There is no reference to the optical swing in any publication which I have seen. It is a truth that in all cases of normal sight the optical swing can be demonstrated.
In all cases of imperfect sight the optical swing is modified; it may be lengthened, it may become too rapid and irregular. The swing is a necessary part of perfect sight. The importance of it has not been realized. With the short optical swing the vision is good while the mental efficiency and the efficiency of the nerves and muscles is enormously increased.

Techniques: The Drifting Swing
The Drifting Swing was born of necessity. Bates relates the story in the Better Eyesight Magazines, where one day a patient came to him who could not be helped by any of the other techniques that he had already devised.
I tried many things that I knew and after I had exhausted the things that I had already practiced, I realized that I was up against it, and had to devise and have him practice with benefit, something that I had never recommended before. As he could not think of anything continuously without discomfort, I suggested that he let his mind drift.
Wm H Bates: Better Eyesight Magazines, January 1924
The Drifting Swing
The technique is to let your eyes and mind keep moving continuously from object to object in the room. As you regard each object, think about a similar object that you know of already in your memory. For example, if you happened to glance at a curtain, think of another curtain that you can recall for a brief moment; then move on.
Each object you see and think of is held only momentarily, the sensation of seeing is constantly linked in with your memory of similar objects, and so with a little application it becomes possible to experience seeing without responsibility or expectation.
The links in the memory do not have to be precise or factual – this is not a test, all that is required is that your eyes and mind are engaged in doing the same thing at the same time: this is every Bates technique.
After a little time the lack of pressure on the visual system, and the lack of pressure on the mind in ‘performing’ has the effect of making an apparent effortless movement in the opposite direction of the movement of the head and eyes.
It’s a quiet and apparently innocuous technique, but perhaps the most subtly powerful of all.
The effect on Bates’ patient on that day was very gratifying, as related, when he first came in nothing had been able to help him:
To hear him talk, he gave you the impression of being very miserable; and for some reason or other, he could describe the condition of general misery more vividly than I have ever had the pleasure (?) of hearing it described before.
Wm H Bates: Better Eyesight Magazines, January 1924
And later on after teaching him the Drifting Swing:
In this I believe, he succeeded, because when I invited him to go into another room, where he could test his sight with the Snellen Test Card, he was smiling, a new experience for him. His vision for distance was normal, and the speed with which he read all the letters on the test card was gratifying.
The rest had given him, at least temporarily, perfect sight for the distance, whereas before even with his glasses on his vision was less than one-half the normal. He was also unable to read diamond type with or without his glasses. After practicing the drifting swing he read the diamond type rapidly, perfectly and without any apparent effort, at less than twelve inches. Then he said to me,

“Doctor, do you think you can help me?”
I answered him, “Did you read the test card and the fine print perfectly?”
“Yes,” he answered and blushed.
That was the first time I ever saw a man blush under such circumstances. The blush was to me an admission that he realized that I had given him a temporary cure.
Wm H Bates: Better Eyesight Magazines, January 1924
Donate Crypto: https://cointr.ee/in5d
[social_warfare]
Image: Pixabay
In5D PATREON: Click here to help support our work thru Patreon. Your support is greatly appreciated!!!
Follow In5D on Patreon, Telegram, Twitter, Bitchute, TikTok, Instagram, Facebook, YouTube, and Truth Social @greggprescott


